Breaking News
Convert Excell To Lables In Word For Mac
вторник 28 января admin 95
Create Mailing Labels in Word from an Excel Spreadsheet. My Mac has plenty of memory and disk space and yet when I get to the part where Word is converting the Excel Spreadsheet I get a message that says: 'There is not enough memory or disk space to convert this document'.
If you've created a database in Excel, you can use its contents to make Microsoft Word labels. The Mail Merge feature in Word enables you to convert Excel data into personalized mailings for each person on your mailing list. You can customize the labels--choosing size and other settings--for your specific needs and preview them before printing.
Step 1
Step 2
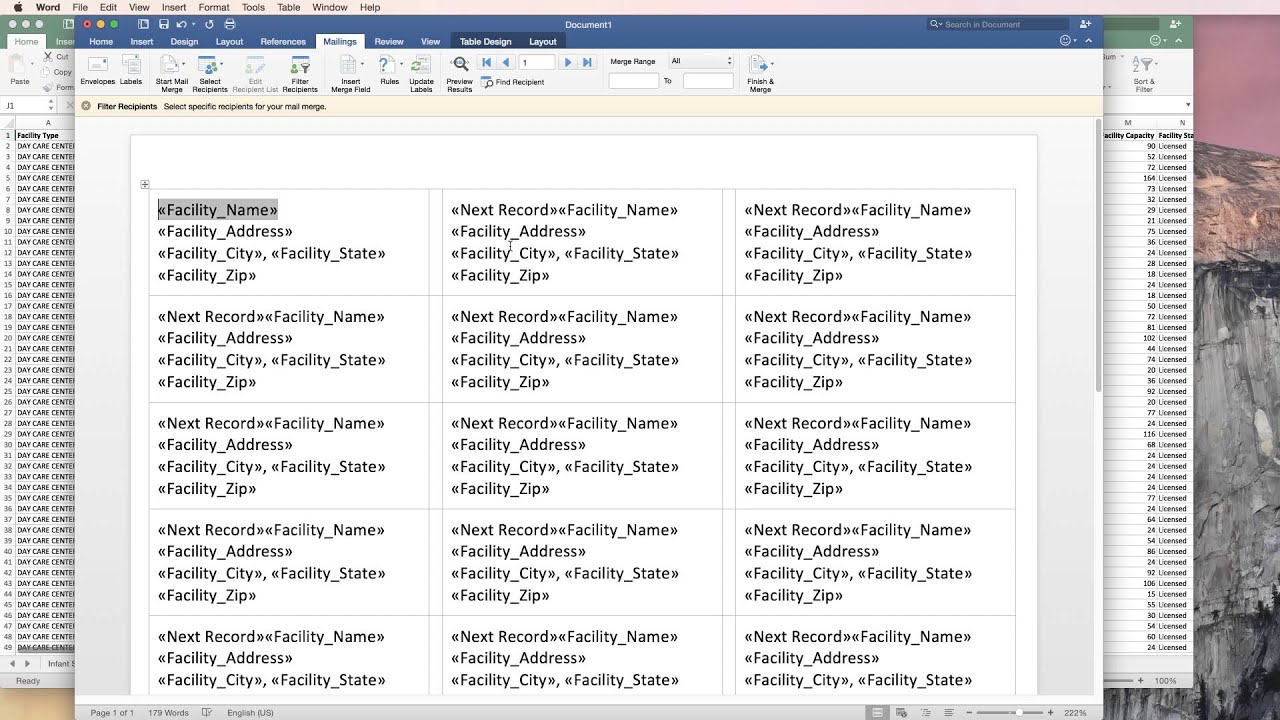
Select 'Mailings' and 'Start Mail Merge' from the Ribbon. Choose 'Labels' from the drop-down list. Pick your label settings in the 'Label Options' dialog box, and then click 'OK.'
Step 3
Choose 'Select Recipients' and 'Use Existing List' from the Ribbon. The 'Select Data Source' dialog box will open. Navigate to the Excel file you want to use, and select it. Then click 'Open.'
Step 4
Select the correct worksheet from the 'Select Table' dialog box. If your Excel spreadsheet includes column headers, checkmark 'First row of data contains column headers.' Otherwise, deselect it. Then click 'OK.' A sheet of labels will load on your screen.

Step 5
Select 'Mailings' and 'Edit Recipient List' from the Ribbon. You may choose the selected recipients or remove the ones you don't want to include. Click 'OK.'
Step 6
Make sure your cursor is on the first label on your page. Then select 'Mailings' and 'Insert Merge Field' from the Ribbon. A list of fields from Excel will appear in the pop-up. Click the merge field you want to insert. It will be added to your label.
Step 7
Customize the label by inserting a comma or pressing the 'Enter' key or space bar after the merge field. Click 'Mailings' and 'Insert Merge Field' in the Ribbon to choose your next merge field. Repeat step until each merge field has been added.
Step 8
Click on 'Mailings' and 'Update Labels' in the Ribbon to replicate the contents of the first label.
Step 9
Click on 'Mailings' and 'Preview Results' in the Ribbon to view the labels from Excel.
Step 10
Select 'Mailings,' 'Finish & Merge' and 'Edit Individual Documents' from the Ribbon to complete the merge. The 'Merge to New Document' dialog box will open. Select 'All' under 'Merge records,' and click 'OK.' The Excel labels will be added to your page.
Select the Office button, and click 'Save.' Name the labels in the 'Save As' dialog box, and then click 'Save.'
- Swirly Label image by Stacey Alexander from Fotolia.com
More Articles
2020-03-06 18:14:37 • Filed to: PDFelement for Mac How-Tos • Proven solutions
People always ask 'how do I save an Excel spreadsheet as a PDF on Mac', the answer is easy. With PDFelement you can convert excel to PDF on Mac with a drag and drop action. Microsoft Excel is a standard spreadsheet application used for performing calculations and creating dynamic tables and graphs. It is widely used by within the business world on a daily basis.
Convert Excel to PDF on Mac
Step 1. Open and Import Files
When PDFelement launches, you can simply drag and drop your files into the program window.
Step 2. Create Excel to PDF
Once your excel file has been opened in it, then the PDF file has been created successfully. Click the 'File'>'Save as' button on the top menu to save the created PDF on your Mac directly.
Step 3. Edit PDF as you need
PDFelement can also help you view, edit, and print PDFs so that they look polished and professional. If you need to add tables or data from other Excel files, PDFelement allows you to do that through a simple process. It is compatible with macOS 10.12, 10.13, 10.14 as well as the latest macOS Catalina 10.15. Here is how to edit PDF text on Mac for your reference.
PDF files are usually easier to manage, share, and present within a professional setting. Many Microsoft Office documents types present better in PDF format and will be less likely to get manipulated by end users. This is one of the reasons why many official publications are often presented in PDF. Like other files, Excel files also look more professional when presented in PDF format. That's why it's often necessary to save Excel as PDF on Mac.
How to Save Excel as PDF on Mac
Step 1. Open an Excel File
Open your file in Excel. If you only want a part of the spreadsheet to be saved as a PDF, then select only the area you want to convert. Otherwise, the whole sheet will be saved as a PDF file.
Step 2. Export Excel to PDF
Then click the 'File' > 'Save As..' button on the top menu. In the new pop-up window, choose PDF in the 'Save As' option to save directly.
Convert Excel to PDF with PDF Creator for Mac
PDF Creator for Mac allows you to convert Microsoft Office documents, including Excel, Word, PPT, and more to PDF. Even beginners can use it since it has a simple and intuitive interface. Additionally, PDF Creator for Mac allows you to convert all documents created via Microsoft Office to PDF on the same platform without the need for downloading additional tools.
Step 1. Open and Import Files
When PDF Creator for Mac launches, you will see a simple interface allowing you to upload your excel files for conversion. You can simply drag and drop your files into the program window to upload them. Otherwise, you can import your files by clicking the 'Add Files' button at the top or the 'Add Folder' button if you have more than one file to upload.
Step 2. Create Excel to PDF
Click 'Create' at the bottom and select the destination folder for the files you are converting. Be sure to select a folder that you can easily locate, otherwise, you might lose your newly-converted PDF file.
Step 3. Preview Files
When you click 'Save' in the previous window, PDF Creator for Mac proceeds to convert your Excel file to PDF. You can click 'Preview' on the next window to take a sneak peak of the file that has been converted. You can also click 'Show in Finder' to view the PDF file.
Free DownloadFree Download or Buy PDFelementBuy PDFelement right now!
Soda Player for Mac enables you to easily stream torrent videos and movies minus the download requirement - simple, fast video streaming.With this video player, you have the option to quickly play magnet links and torrent files without wasting time, simply drag n' drop a file and then go or quickly open a torrent or video file (software for macOS).It includes support for all formats and codecs. Download 1.4.2 for Mac. To open the app after installing, go to your Applications folder on your Mac. Mini-Player mode (smaller player that stays on top of other windows, in the corner of your screen). It will be cheaper than your average VPN), but for now while we iron out the bugs it's included for free:). The 1.4.2 version of Soda Player for Mac is provided as a free download on our software library. The file size of the latest downloadable setup file is 64.2 MB. Our antivirus check shows that this Mac download is virus free. The software lies within Audio & Video Tools, more precisely Players. Soda player. soda player 1.3.9 free download for mac pc. Soda Player plays local, Web, and BitTorrent video files in any formats without the need of additional software programs or codecs. 9/10 - Download Soda Player Mac Free. Soda Player is a multimedia player for macOS platforms, compatible with playing videos via streaming through torrents while preserving our privacy. Soda Player is a multimedia player for Mac that can open and play videos stored locally or remotely by means of.